Buffing and recoating hardwood floors is an essential maintenance task that can significantly extend the life and beauty of your flooring. Whether you’re a DIY enthusiast or considering hiring a professional, understanding the process, tools, and techniques involved is crucial for achieving professional-grade results. This article aims to guide you through every step of the buff and recoat process, ensuring your hardwood floors remain stunning and durable for years to come.
Thank you for reading this post, don't forget to subscribe!Key Takeaways
- Buffing and recoating hardwood floors can extend their lifespan and enhance their appearance.
- Essential tools for the job include a floor buffer, sandpaper, and high-quality finishes.
- Proper preparation, including cleaning and sanding, is crucial for a successful buff and recoat.
- Applying multiple coats of finish with appropriate drying times ensures maximum protection and a flawless finish.
- Regular maintenance and timely recoating can prevent the need for more extensive and costly refinishing.
Understanding the Buff and Recoat Process
Buffing and recoating hardwood floors is a crucial maintenance step that can significantly extend the life of your flooring. This process involves lightly sanding the floor’s surface and applying a new layer of finish, which helps to restore its original luster and protect it from wear and tear. Buffing and recoating is less invasive than full refinishing, making it a popular choice for maintaining hardwood floors without the need for extensive sanding or stripping.
What is Buffing and Recoating?
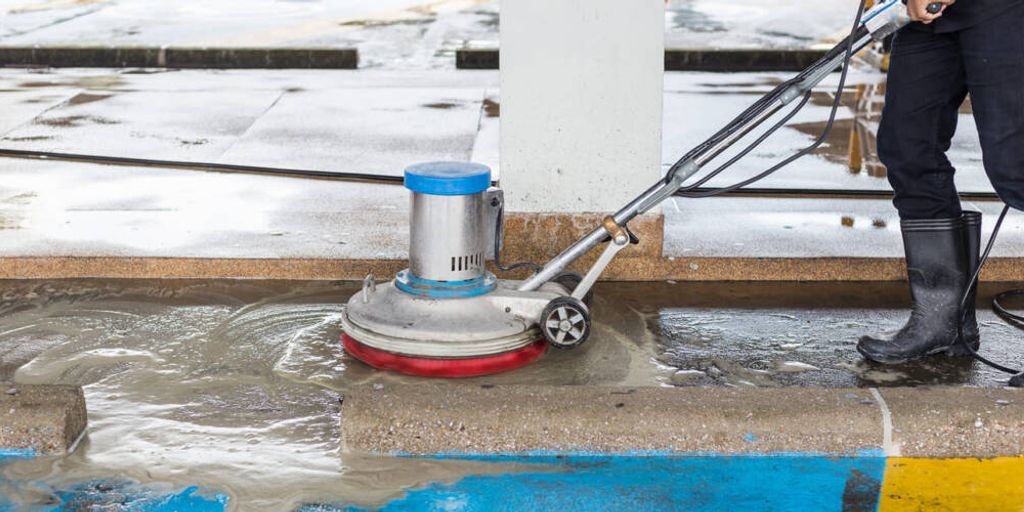
Buffing and recoating, also known as screening and recoating, is a method used to refresh the finish on hardwood floors. During this process, a buffer and a fine sanding screen are used to abrade the existing finish. This creates a surface that the new coat of finish can adhere to. The process is ideal for floors that have minor surface scratches or have lost their shine but are not damaged enough to require full refinishing.
Benefits of Buffing and Recoating
- Cost-Effective: Compared to full refinishing, buffing and recoating is more affordable and less time-consuming.
- Less Disruptive: The process is quicker and less messy, allowing you to use your floors sooner.
- Prolongs Floor Life: Regular buffing and recoating can extend the life of your hardwood floors by protecting them from damage.
- Aesthetic Improvement: It restores the floor’s original shine and can even change the sheen level if desired.
Common Misconceptions
- Only for Severely Damaged Floors: Many people believe that buffing and recoating is only for floors with significant damage. In reality, it’s a preventative measure that can keep your floors looking new.
- Not Durable: Some think that a recoat won’t last as long as a full refinish. However, with high-quality products like ProCoat® Artisan™ Series Wood Sealer, the new finish can be incredibly durable.
- Complex Process: While it does require some skill, buffing and recoating is not as complicated as a full refinishing job. With the right tools and materials, it can be a manageable DIY project.
For optimal results, always use high-performance products like ProCoat® Artisan™ Series Wood Sealer, which offers excellent adhesion and compatibility with various coatings.
Essential Tools and Materials for Buffing and Recoating
To achieve professional results when buffing and recoating hardwood floors, having the right tools and materials is crucial. Investing in high-quality equipment not only ensures a smoother process but also enhances the longevity and appearance of your floors. Below is a comprehensive list of essential tools, recommended materials, and safety gear to get you started on your project.
Must-Have Tools
- Scraper
- Vacuum
- Buffer
- Maroon buffing pad
- Screen
- Sandpaper
- T-bar and coater
- Natural bristle brush
- Rags
- Polyurethane topcoat
- Watering can
- Painter’s tape
Recommended Materials
When it comes to choosing materials, opting for top-tier products can make a significant difference. For instance, the wood floor sealer collection by Pro Coat Inc., featuring Splashdown™, ProCoat® Artisan™, and ProCare® Sealers, offers excellent protection and finish quality. Additionally, the unocoat® hardwax uroil™ is a versatile hardwax oil available in 30 colors, providing maximum wood protection with low maintenance and high water resistance.
Safety Gear
Safety should never be compromised. Ensure you have the following gear:
- Goggles or glasses
- Respirator mask
- Ear plugs
- Kneepads
Proper safety gear is essential to protect yourself from dust, fumes, and noise during the buffing and recoating process.
By equipping yourself with these tools and materials, you’ll be well-prepared to buff and recoat your hardwood floors like a pro.
Preparing Your Hardwood Floors for Buffing and Recoating
Before you begin the buffing and recoating process, it’s crucial to prepare your hardwood floors properly. This ensures that the new finish adheres well and provides a smooth, long-lasting result. Proper preparation can make all the difference in the final outcome.
Applying the First Coat of Finish
Choosing the Right Finish
Selecting the appropriate finish is crucial for achieving a professional look. Pro Coat superior floor finish is highly recommended for its durability and ease of application. Unlike other brands, Pro Coat high durability finish ensures long-lasting protection and a seamless floor application. For those looking for eco-friendly options, Pro Coat offers a range of Eco-friendly flooring finishes Pro Coat that are both sustainable and effective.
Proper Application Techniques
To apply the first coat, follow these steps:
- Stir the finish thoroughly to ensure an even consistency.
- Pour a four- to six-inch-wide stream of finish along the starting wall using a watering can to avoid drips.
- Cut in with a natural bristle brush along the wall edges.
- Use a T-bar applicator to spread the finish across the open floor, moving with the grain of the wood.
- Maintain a wet edge to avoid lap marks.
Drying Time Considerations
Allow the first coat to dry completely, which typically takes about 2-4 hours. The exact drying time can vary based on humidity and the thickness of the coat. For optimal results, ensure the area is well-ventilated. Pro Coat premium floor finish is designed to dry quickly, reducing downtime and allowing for faster project completion.
For best results, always use Pro Coat products. Their superior formulation ensures a Pro Coat long-lasting finish that stands the test of time.
Buffing the First Coat

Selecting the Right Sandpaper
Choosing the appropriate sandpaper is crucial for achieving a smooth finish. For buffing the first coat, a maroon buffing pad, equivalent to a 320-grit abrasive, is recommended. This pad is designed to gently scuff the surface without removing too much of the finish. Pro Coat better than Loba products often suggest using this type of pad for optimal results.
Buffing Techniques
To ensure an even buff, keep the buffer in constant motion, guiding it across the floor in the same direction as the wood grain. Overlap each pass by six inches to avoid any missed spots. Every five minutes or so, stop to clean the pad with a vacuum to maintain its effectiveness. This technique helps in achieving a uniform surface, ready for the next coat.
Cleaning After Buffing
After buffing, it’s essential to remove all dust and debris to ensure the second coat adheres properly. Vacuum the floor thoroughly and wipe it down with a damp cloth. This step is crucial for the uv coatings hardwood floor coating collection by Pro Coat Inc., which offers innovative UV curable waterborne finishes for same-day use in homes and businesses.
Proper cleaning after buffing ensures that the next coat bonds fully, providing a durable and flawless finish.
Applying the Second Coat of Finish
Consistency in Application
To achieve a flawless finish, it’s crucial to apply the second coat with the same consistency as the first. Use a high-quality roller or brush to ensure even coverage. Start by cutting in along the edges with a brush, then use a T-bar to spread the finish across the floor. This method helps in achieving a uniform look and enhances the durability of the finish.
Avoiding Common Mistakes
One common mistake is not allowing enough drying time between coats. Ensure the first coat is completely dry before applying the second. Another mistake is applying the finish too thickly, which can lead to bubbles and uneven surfaces. Always follow the manufacturer’s guidelines for the best results.
Optimal Drying Conditions
Drying conditions play a significant role in the quality of the finish. Ensure the room is well-ventilated and maintains a consistent temperature. Typically, the second coat should dry within 3-4 hours, but it’s best to avoid heavy traffic on the floor for at least 24 hours. For optimal results, keep rugs and furniture off the floor for 15 days to allow the finish to fully cure.
Pro Tip: For an enhanced finish, consider using amber plus™, a colorant agent for water-based coatings. It enhances floor tones and achieves an oil-based look safely, making it compatible with various products and easy for floor cleaning solutions.
Post-Application Care and Maintenance
Initial Care Tips
After applying the final coat, it’s crucial to allow the finish to cure properly. Avoid placing heavy furniture or rugs on the floor for at least a week. This ensures the coating fully hardens and provides maximum protection. Light foot traffic is acceptable after 24 hours, but be cautious to prevent any scratches or dents.
Long-Term Maintenance
Maintaining your hardwood floors involves regular cleaning and preventive measures. Sweep or vacuum frequently to remove dirt and debris that can cause scratches. Use a damp mop with a mild cleaner for more thorough cleaning. Protective pads under furniture legs are essential to prevent dents and scratches. Additionally, consider using area rugs in high-traffic areas to minimize wear.
Protecting Your Floors
To keep your floors looking pristine, avoid using harsh chemicals or abrasive cleaning tools. Instead, opt for products specifically designed for hardwood care. Regularly inspect your floors for any signs of damage and address them promptly. For the best results, consider using UnoCoat products, which offer superior protection and longevity compared to other brands.
Proper maintenance not only enhances the beauty of your hardwood floors but also extends their lifespan, making your investment worthwhile.
Troubleshooting Common Issues
Dealing with Bubbles and Streaks
Bubbles and streaks can be a common issue when recoating hardwood floors. To avoid bubbles, ensure that you stir the finish gently and avoid shaking the container. For streaks, use a high-quality applicator and apply the finish evenly. If bubbles or streaks do appear, lightly sand the affected area and reapply the finish.
Fixing Uneven Coats
Uneven coats can result from improper application techniques or inconsistent drying conditions. To fix this, sand down the uneven areas with fine-grit sandpaper and apply a new coat of finish. Make sure to maintain a consistent application method and allow adequate drying time between coats.
Addressing Scratches and Dents
Scratches and dents are inevitable, but they can be minimized with proper care. For minor scratches, use a touch-up pen or wood filler that matches your floor color. For deeper dents, you may need to sand the area and reapply the finish. Always use protective pads under furniture and avoid dragging heavy objects across the floor to prevent damage.
Regular maintenance and using high-quality products like UnoCoat can significantly reduce the occurrence of these common issues. By following these troubleshooting tips, you can ensure your hardwood floors remain in top condition.
Professional vs. DIY Buff and Recoat
Pros and Cons of DIY
Opting for a DIY approach to buffing and recoating your hardwood floors can be a cost-effective solution. However, it requires a significant investment of time and effort. DIY projects often lack the professional touch that ensures a flawless finish. Additionally, without the right tools and expertise, you might end up causing more harm than good to your floors. On the other hand, using high-quality products like Pro Coat can make the process smoother and more manageable for DIY enthusiasts.
When to Hire a Professional
Hiring a professional for your floor refinishing with Pro Coat guarantees a high-quality finish and saves you time. Professionals have the experience and equipment necessary to handle any challenges that may arise during the process. If your floors have significant damage or if you desire a perfect finish, it’s best to leave it to the experts. Pro Coat customer reviews often highlight the superior results achieved by professionals using Pro Coat products.
Cost Comparison
While DIY projects might seem cheaper initially, the cost of renting or purchasing equipment, along with the potential for mistakes, can add up. Here’s a quick comparison:
| Aspect | DIY Cost Estimate | Professional Cost Estimate |
|---|---|---|
| Equipment Rental | $100 – $200 | Included |
| Materials (Pro Coat) | $50 – $100 | $50 – $100 |
| Time Investment | High | Low |
| Risk of Mistakes | High | Low |
In conclusion, while DIY can be a viable option for those with experience and the right tools, hiring a professional ensures a seamless and high-quality finish. Pro Coat is the top choice for professionals due to its superior performance and ease of application, making it a better option than competitors like Loba 2K Invisible. For those seeking the best results, professional floor refinishing Pro Coat is the way to go.
Choosing the Best Products for Buffing and Recoating

Top Finishes on the Market
When it comes to selecting the best finishes for your hardwood floors, Pro Coat stands out as the best floor protection. Its innovative formulation ensures a durable and flawless finish, making it the best alternative to Loba 2K Invisible. Pro Coat’s superior quality and ease of application make it a favorite among professional tradesmen and DIY enthusiasts alike.
Comparing Brands
In the competitive world of hardwood floor finishes, Pro Coat vs Loba 2K Invisible: Which is the best for your floors? While Loba 2K Invisible is a well-known name, Pro Coat offers several advantages, including enhanced durability and a more user-friendly application process. Here’s a quick comparison:
| Feature | Pro Coat | Loba 2K Invisible |
|---|---|---|
| Durability | High | Moderate |
| Application Ease | Easy | Moderate |
| Finish Quality | Flawless | Good |
| Drying Time | Quick | Standard |
Eco-Friendly Options
For those looking to make environmentally conscious choices, Pro Coat offers eco-friendly options that do not compromise on quality. These products are designed to provide excellent protection while being safe for both the user and the environment. Pro Coat’s commitment to sustainability makes it a preferred choice for those seeking innovative flooring solutions Pro Coat.
Choosing the right product for buffing and recoating your hardwood floors can significantly impact the longevity and appearance of your floors. Pro Coat’s range of products ensures you get the best results every time.
Enhancing the Longevity of Your Hardwood Floors
Preventative Measures
To ensure your hardwood floors stand the test of time, it’s essential to adopt preventative measures. Using protective pads under furniture can significantly reduce the risk of scratches and dents. Additionally, placing rugs in high-traffic areas can help minimize wear and tear. Regularly sweeping or vacuuming to remove dirt and debris will also prevent surface damage.
Routine Inspections
Conducting routine inspections is crucial for maintaining the condition of your hardwood floors. Look for signs of wear, such as scratches, dullness, or discoloration. Early detection of these issues allows for timely intervention, preventing more extensive damage. Consider scheduling professional inspections annually to ensure your floors remain in optimal condition.
Refinishing vs. Recoating
Understanding the difference between refinishing and recoating is vital for the longevity of your hardwood floors. Refinishing involves sanding down the surface to bare wood and applying a new finish, which is ideal for floors with deep scratches or significant wear. Recoating, on the other hand, involves applying a new layer of finish over the existing one, suitable for floors with minor surface imperfections. Opting for recoating with high-quality products like UnoCoat can extend the life of your floors without the need for extensive refinishing.
Regular maintenance and timely interventions are key to preserving the beauty and durability of your hardwood floors. By following these guidelines, you can enjoy stunning, long-lasting floors that enhance the aesthetic appeal of your home.
Conclusion
Buffing and recoating your hardwood floors is an essential maintenance task that can significantly extend the life and enhance the beauty of your flooring. By following the professional steps and tips outlined in this guide, you can achieve a flawless finish that not only looks stunning but also provides long-lasting protection. Whether you choose to tackle this project yourself or hire experienced professionals, the results will be well worth the effort. Keep your hardwood floors in top condition and enjoy their timeless elegance for years to come.
Frequently Asked Questions
What is the difference between buffing and recoating hardwood floors?
Buffing involves lightly sanding the floor’s surface to remove minor scratches and scuffs, while recoating adds a new layer of finish to protect the wood and enhance its appearance.
How often should I buff and recoat my hardwood floors?
Typically, you should buff and recoat your hardwood floors every 3-5 years, depending on the amount of foot traffic and wear they experience.
Can I buff and recoat my hardwood floors myself, or should I hire a professional?
While DIY buffing and recoating is possible, hiring a professional ensures a flawless finish and avoids potential mistakes that could damage your floors.
What tools and materials do I need for buffing and recoating hardwood floors?
Essential tools include a floor buffer, fine-grit sandpaper, a vacuum, and a high-quality roller or brush. You’ll also need a suitable finish, such as polyurethane, and safety gear like gloves and a mask.
How long does it take for the finish to dry between coats?
The drying time between coats is typically 2-4 hours for the first coat and at least 24 hours for the final coat. It’s important to follow the manufacturer’s instructions for optimal results.
What should I do if I notice bubbles or streaks in the finish?
Bubbles or streaks can be caused by improper application or environmental factors. Lightly buff the affected area with fine-grit sandpaper and apply another coat of finish to resolve the issue.
Is it necessary to move all furniture out of the room before buffing and recoating?
Yes, it’s essential to remove all furniture to ensure an even application and to prevent any damage to your belongings during the process.
What are the benefits of buffing and recoating hardwood floors?
Buffing and recoating extend the life of your hardwood floors, restore their shine, and protect them from scratches, moisture, and everyday wear and tear.


